Calibrating the measuring tool
The following tasks should be performed only by well-trained and qualified persons. The legalities with regard to performing an accuracy check or calibration of a measuring tool must be known.
- Perform calibration of the measuring tool with extreme precision or have the measuring tool checked by a Bosch customer service agent. Inaccurate calibration leads to incorrect measuring results.
- Only start the calibration if you have to perform a calibration of the measuring tool. As soon as the measuring tool is in calibration mode, you must perform the calibration meticulously to the end in order to ensure that no incorrect measuring results are produced afterwards.
- Check the levelling accuracy after every calibration . If the deviation is outside the maximum permitted limits, have the measuring tool checked by a Bosch- customer service agent.
Note: Calibration of the Z‑axis is only possible via Bosch customer service.
X-axis and Y-axis Calibration
Calibration of the measuring tool should (as described below) where possible be performed using the LR 45 laser receiver. Calibration without a laser receiver is only possible under favourable lighting conditions and is associated with a higher risk of error.
The positions of the measuring tool and laser receiver cannot be changed during calibration (with the exception of the alignments or rotations described). Therefore position the measuring tool on a firm, level surface and secure the laser receiver.
Calibration should be performed via the Bosch Levelling Remote App if possible. There is less likelihood of error when controlling the tool via the app. Otherwise, the measuring tool's position can be altered if buttons are pressed without due care.
When calibrating without the app, the corresponding buttons on the measuring tool must be pressed.
A free measuring distance of 30 m on a firm surface is required. If no such measuring distance is possible, calibration can also be performed with lower levelling accuracy on a measuring distance of 15 m.
To mount the measuring tool and the laser receiver for calibration:
- Mount the measuring tool in the horizontal position 30 m or 15 m from the laser receiver on the tripod (26) or position it on a firm, level surface.
- Secure the laser receiver at the correct height:
- Either to a wall or to another surface by means of magnets on the laser receiver,
- or to a securely fastened aid with the holder for the laser receiver.
To do this, consult the operating instructions for the laser receiver.
Aligning the measuring tool for calibration:
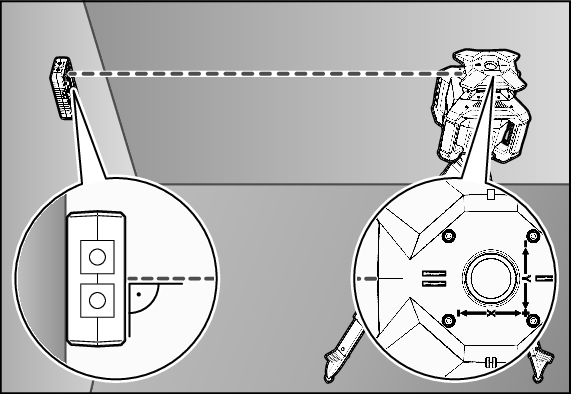
- Align the measuring tool so that the X-axis indicator imprinted on the measuring tool with the "−" side is pointing to the laser receiver. For this, the X‑axis must be perpendicular to the laser receiver.
Information on calibration:
- During calibration, all buttons on the measuring tool that are not required for calibration are deactivated.
- If no button is pressed for longer than 5 min during calibration or if no signal is sent via the Bosch Levelling Remote App for longer than 5 min, calibration on the measuring tool is cancelled. No changes will be saved. <Er> and <01> flash red alternately in the slope angle indicator (8). To return to normal operation, close the error message and briefly press the
 button on the measuring tool.
- Calibration of the measuring tool can be cancelled at any time via the app or by pressing and holding the button on the measuring tool. No changes will be saved. It is not possible to return to a previous step during calibration.
- If the connection to the measuring tool is interrupted during calibration via the app, calibration can be continued on the measuring tool (see Calibration process without app).
To start calibration:

- The measuring tool must be in a horizontal position. If it is in a vertical position, calibration cannot be started either via the app or on the measuring tool.
Calibration via the Bosch Levelling Remote App:
- Switch on the measuring tool.
- Establish the connection to the mobile device using the Bosch Levelling Remote App.
- Start calibration in the app.
- Follow the instructions in the app.
Calibration without the app:
- The measuring tool must be switched off.
- Press and hold the
 button on the measuring tool. Briefly press the button and release it again to start calibration.
- The measuring tool is levelled. The levelling is shown by rotating segments in the slope angle indicator (8).
- After levelling is completed, <C1> flashes red in the slope angle indicator (8).
To perform calibration without the app:
- Switch the laser receiver on.
- Align the height of the laser receiver so that the variable laser beam (1) on the laser receiver is indicated as "centred". To do this, consult the operating instructions for the laser receiver.
- Secure the laser receiver at this height.
Calibration of the X-axis:
- Check whether the measuring tool and laser receiver are correctly aligned with each other (the "−" side of the X-axis is aligned with the laser receiver).
- Make sure that the variable laser beam (1) is displayed as centred on the laser receiver.
- Rotate the measuring tool 180° so that the "+" side of the X‑axis is directed at the laser receiver.
- Briefly press the
 button on the measuring tool to confirm the rotation.
- After levelling is completed, <C2> flashes red in the slope angle indicator (8).
- Check the distance from the laser beam to the centre mark in the relative height indicator on the laser receiver.
- For each rotation, take care not to change the height and slope of the measuring tool.
The maximum permitted deviation on the 30 m measuring distance is as follows: 3 mm. If the value displayed on the laser receiver is greater than 3 mm, the alignment of the laser must be corrected:
- Press the button or the
 button on the measuring tool repeatedly until the value of the relative height displayed on the laser receiver has been halved.
Example: If a value of 10 mm is displayed on the laser receiver, press the buttons on the measuring tool repeatedly until the value on the laser receiver is 5 mm. - Briefly press the button on the measuring tool to save the X-axis calibration.
- After levelling is completed, <C3> flashes red in the slope angle indicator (8).
Calibration of the Y-axis:
- Rotate the measuring tool 90° so that the "−" side of the Y‑axis is directed at the laser receiver.
- Make sure that the variable laser beam (1) is displayed as centred on the laser receiver.
- Rotate the measuring tool 180° so that the "+" side of the Y‑axis is directed at the laser receiver.
- Briefly press the button on the measuring tool to confirm the rotation.
- After levelling is completed, <C4> flashes red in the slope angle indicator (8).
- Check the distance from the laser beam to the centre mark in the relative height indicator on the laser receiver.
- If necessary, correct the distance as described for the X-axis.
- Then briefly press the button on the measuring tool to save the Y-axis calibration.
- <C> lights up green for 2 s in the slope angle indicator (8).
If the calibration has been completed successfully, the measuring tool then automatically switches itself off.
Calibration failed:
If the calibration of the X-axis or the Y-axis cannot be saved, <Er> and <02> flash red alternately in the slope angle indicator (8).
- Briefly press the button on the measuring tool to confirm the message.
- The measuring tool returns to normal operation without any changes.
- Restart the calibration.
If calibration fails again, have the measuring tool checked by a Bosch customer service agent.